Windows
- Download the Pulse Secure for Windows VPN client installer (you may need your campus login to assess the page).
- Double click the downloaded installation package and complete the installation.
- Once installation is complete, click on the Pulse Secure icon in the system tray to open the Pulse menu.
- Select UCSF Dual Factor Remote Access and click Connect.
- Enter UCSF username and password and click Connect.
- Use one of the Duo authentication methods to provide a Secondary Password and click Connect.
- Pulse Secure will minimize and appear in the taskbar, and the icon in the system tray will change indicating that it is connected to the UCSF network.
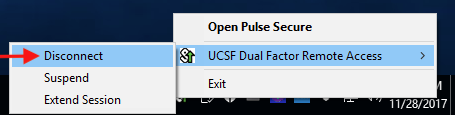
- To disconnect Pulse Secure from the UCSF network, click on the Pulse Secure tray icon, select UCSF Dual Factor Remote Access, and click Disconnect.


MacOS
- Download the Pulse Secure for Mac VPN client installer (you may need your campus login to assess the page).
- Double click the downloaded package and follow the prompts to install.
Open Pulse Secure from the Applications folder, and click on the Pulse Secure icon.

Select UCSF Dual Factor Remote Access and click Connect.


Enter UCSF username and password and click Connect.

- Use one of the Duo authentication methods to provide a Secondary Password and click Connect.
Once connected, you will see a green check mark next to your VPN client profile. (The icon in the system tray will also start pulsing, indicating connection to the UCSF network.)

To disconnect Pulse Secure from the UCSF network, click on the Pulse Secure menu bar icon, select UCSF Dual Factor Remote Access and click Disconnect.
